|
Help

ACCOUNTS PAYABLE is divided in to
four main parts.
The first part of ACCOUNTS PAYABLE
is BASIC CHECKING that is designed to look and feel like
your check book except that all of the more complicated
fields are there that are not on your check book suck as
account number, category number / category description and
the XX field - X to pay now, * for a condensed check and a
space to pay later.
The second part of the accounts
payable is the Enter Check Information menu.
This menu
option allows the user to search for the vendor by
name. If the
user chooses the check information option the program will
then prompt the user for more detailed information on the
received amount such as check number, amount paid, amount
invoice, job name, vendor number.
The program then stores this information for later
use. The second part of the accounts payable program is
the check register which has its own help section.
Both Basic Checking and Enter Check
Information can be used interchangeably.
For both Basic Checking and Enter Check
Information, Amount Due line item figures represent only
the Amount Due for the line item (Invoice Amount - Amount
Paid) not for the entire invoice.
Amount due in the subtotals and totals in the
reports represent the Amount Due on the invoices /
filtered by invoice number as it should be.
The third part of accounts payable
is the report menu which generates a number of reports
including statements for income at any point in time,
monthly, yearly reports and 1099's.
Accounts payable gives you the
option to pay checks later and write them ahead of time.
The field XX as displayed in the check entry parts
of the program needs to have a X in it before the checks
can be routed to the screen or printer and the stored to
permanent data.
This will probably confuse some people if they do
not see this variable, but we received many requests for
the ability to write checks and only pay some of them at a
time. The
symbol * denotes condensed checks for the purpose of
writing the same vendor one check for several different
jobs.
The DATA MANAGER is
also in this module, as in the other modules in order to
effectively manage general (in this case vendor)
information.
.7.
CHECK REGISTERS
There are check register programs
located in both ACCOUNTS PAYABLE AND PAYROLL.
We decided set computerized check formatting up so
that there would be 2 check stubs and 2 checks per page.
Laser printers do not like to have partially
processed pages sitting in them therefore, the additional
decision was made to have pages eject after checks are
printed. This
means if you have an odd number of checks in a batch you
will either waste one of the checks or have to send it
through the printer again if you do not want to waste it.
If you have a dot matrix printer you can simple
roll the check page back after printing to avoid wasting a
check. We
tested this program with Check Soft Express from Office
Max.
The first option in the check
register menus are CHECKS TO SCREEN.
In this option, checks and pay stub information are
sent to the screen as if printing.
In the second option, CHECKS TO PRINTER, checks are
sent to the printer in the form of checks. ( if the checks
are marked with a X or a * in the XX field).
Condensed check are written by
writing several checks to the same vendor with the XX
field marked with a *.
** For release 5 of this program,
please restrict yourself to one condensed check at a time.
The program currently cannot produce more than one
condensed check per check run.
If you mark the PAYTYPE field as
CASH or CREDIT then the program will not produce a check
when this information posts and the checks are run.
**
If the check information is correct
one should "POST CHECKS THE PERMANENT CHECK REGISTER"
which will store all printer checks in the CHECK REGISTER
to the PERMANENT CHECK REGISTER and will print.
The CHECKS TO SCREEN option can
"STORE CHECKS TO THE PERMANENT CHECK REGISTER", but the
assumption is that you will probably not use this because
printing checks is easier that writing them by hand.
For both Accounts Payable and
Payroll the DATEPAID field is automatically filled in for
you when the checks are printed and then you are asked "
ARE THE CHECKS RIGHT AND READY TO BE STORED TO THE
PERMANENT CHECK REGISTER ?" and you say "YES"
The Adjust Accounts Information is
very much like what your bank might show you and is
described as followed:
.8.
When you write checks the check
amounts are deducted from your balance that you currently
see from the Accounts Management Screen.
If the top of this screen says "CHECKING ACCOUNT"
then Accounts Payable and Payroll checks you write will
deduct from the "CHECKING ACCOUNT" when you post the
checks to PERMANENT DATA. If the top of this screen says
"SAVINGS" then the checks you write in Accounts Payable
and Payroll
will deduct
from the "SAVINGS" account when you
post the checks to Permanent Data.
ECT... You have 4 accounts you can set up under the
CHANGE ACCOUNTS INFORMATION option. If you go to CHANGE
ACCOUNT INFORMATION and then USEACCOUNT you may enter a
number from 1 -4 which will decide which of the 4 accounts
the program points to. The DEPOSIT / WITHDRAWAL REPORT
also exists in the Accounts Payable report menu and shows
detailed information on your account activity just like
your bank might show it to you.
CHECK REGISTER REPORT is a report
with amount totals for this check batch.
ALIGNMENT REPORT makes sure the
checks and printer is aligned correctly.
Database Grid are options that view
the various databases in which information is stored.
AR does
auto (on the fly) calculations inside grids.
At this time AP only does auto calculations, only
when writing checks or posting. If you choose to mark
records in AP as paid that are not paid or unpaid that are
paid then the reports will reflect these inaccuracies.
.9.
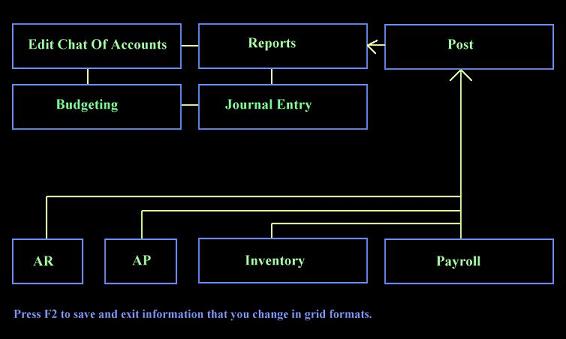
General Ledger
Balance Sheets
Capital Statements
Chart of Accounts
Income Statements
Profit Loss Statements
Trial Balances
Budgeting
Journal Entry
General Ledger / Job Costing Interface.
Total
Fixed Inventory is automatically reflected in General
Ledger as account number 12002.
The general ledger part of the
program keeps tract of general ledger account information.
General ledger account numbers and corresponding
descriptions are linked to the various parts of the
accounting program by keeping track of what kind of
transaction is taking place and for what amount.
Standard reports that appear in this part of the
program include balance sheet, capital statement, chart of
accounts, income statement, profit-loss statement, trial
balance and journal report.
The post option in general ledger
posts all current information from various parts of the
program to general ledger.
Applications for this type of information includes,
tracking where the largest amounts of transactions are
taking place, profit margin analysis and quick access to
total figures on account information and forecasting.
The POST AMOUNTS TO GENERAL LEDGER option takes all
of the check information entered in accounts receivable,
accounts payable, inventory, job costing and payroll and
matches account numbers with general ledger account
numbers. It
then sums this information in to the appropriate debit and
credit column for each account number.
When we were testing the Post
option we thought something was wrong because all of the
values that we expected to fill in were not filling in.
The computer code reads -
USE ARPER
SET FILTER TO SUBSTR(ACCOUNTNO,1,5)
= ACN .AND. DATEPAID > BD .AND. DATEPAID < ED
SUM AMOUNTREC TO ACCTOTAL
Which means I need date paid values
filled and account number values filled in for this to
work and for Accounts Payable and Payroll I need to post
check information to the Permanent databases (so that the
DATEPAID values fill in).
While testing this I forgot to fill in the DATEPAID
field for some of the values I was expecting to post to
General Ledger.
My mistake.
For both Accounts Payable and
Payroll the DATEPAID field is automatically filled in for
you when the checks are printed and then you are asked "
ARE THE CHECKS RIGHT AND READY TO BE STORED TO THE
PERMANENT CHECK REGISTER?" and you say "YES", which means
that checks need to be posted to permanent data before
General Ledger will reflect this information. Why should
checks that have not been printed or distributed be
reflected in General Ledger?
They should not.
.10.
Journal Entry allows the user to
make debit and credit alterations that act on the various
account numbers and account descriptions.
When you use the post option in general ledger all
of the journal entries will be erased and the current
state of the accounting package information will be
presented again for the time period entered.
EDIT CHART OF ACCOUNTS allows for
the input of new charts of accounts or the altering of the
existing chart of accounts.
The stipulation on this is that you use 5 digit
account numbers in the EDIT CHART OF ACCOUNTS option and
in the rest of the program.
Aplus Accounting uses a single
posting method for General Ledger and not a double posting
method for General Ledger.
This means that if you want your trial balance to
balance, instead of expecting the program to add false
offset figures to the postings which forces the trial
balance to balance it is up to you to balance your trial
balance. This
can be done with doing your own double posting in the Edit
Chart of Accounts grid or doing your own double posting in
Journal Entry inside the General Ledger module.
We prefer reality over fiction.
If your accounting package is doing an automatic
double posting method we do not think that this is a
realistic view of the current state of your company.
Budgeting is similar to Edit Chart
of Accounts and Trial Balance but instead of reflecting
the actual state of your business Budgeting reflects your
desired state of your business.
As with most parts of the program, users may edit
the account numbers, descriptions and totals in budgeting
as much as they like.
.11.
Inventory
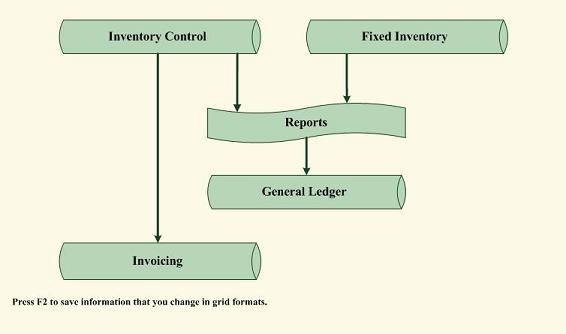
Inventory Control
Inventory control has multiple interfaces
for managing and searching for your inventory data.
Report Menus
Fixed Inventory
Fixed Inventory also has multiple
interfaces for managing and searching for your inventory
data.
Report Menus
This program has 2 inventory
modules. The
first one is activated when INVENTORY is pressed in the
main menu the user will see the INVENTORY CONTROL MENU.
This program is designed to find items subtracted
from its quantity variable when products and quantities
entered in INVOICING match the model variables in
INVENTORY. In
this way the user can keep track or quantities in
inventory just by considering inventory to be reduced at
the time of invoicing.
The FIXED INVENTORY MENU is the same program except
it works off of a completely different data set and
inventory is not reduced from it at the time of invoicing.
Normally fixed inventory is inventory that companies do
not sell on a regular basis such as their office
furniture.
I have given users the opportunity
to user either quantities in inventory or serial numbers.
If you are using quantities in your data records
then it would be inappropriate to use serial numbers also,
because then one data record would only pertain to one
item in inventory, but we felt that this flexibility to do
things either way should be there.
These inventory modules keeps track
of inventory by sorting, adding, deleting and editing
inventory items in a number of ways.
The view option allows the user to
choose from stock items or model number to isolate the
item that is searched for.
In addition, the view option is the largest part of
the inventory program and can even directly edit inventory
items after they have been isolated as well as sorting
data. The
change option allows for the quick changing of inventory
levels as do the data manager screens.
The delete option deletes stock items. The add
option adds stock items.
VIEW INVENTORY and CHANGE INVENTORY
LEVELS were originally written as a DOS application
because we liked the look and feel of many of the
inventory programs that we were seeing.
In our opinion, windows programs often still lack
in leading the users through every step of what the user
should be doing, thereby making the programs dummy proof.
For this reason we left some dBase for DOS code in
this large windows accounting program.
If you do not like VIEW INVENTORY and CHANGE
INVENTORY LEVELS, the same tasks may be accomplished
through the windows looking part of the inventory program
(Data Manager, Grid and inventory reports).
.12.
Inventory Control and Fixed
inventory are identical except that in Inventory Control,
inventory is subtracted from its quantity variable when
products and quantities entered in INVOICING match the
model variables in INVENTORY.
The report menus are present in
both the INVENTORY CONTROL program and in the FIXED
INVENTORY program and reports act respectively on the two
different data sets.
The inventory module can be used
with bar code scanning in to inventory.
Future versions of this program
will include automatic reports to the user on items that
need to be reordered and automatic reordering to vendors
via fax, Email or modem.
.13.
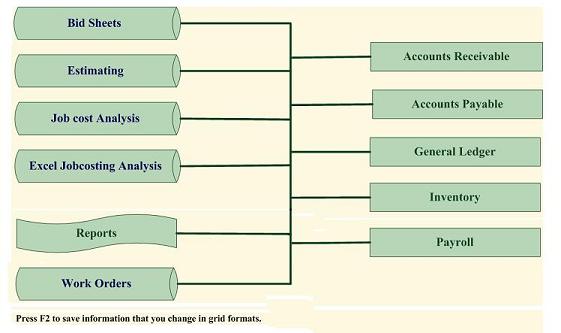
Job Costing
Bid Sheets
Post Estimates to Bid Sheets
Estimating
Job Cost Analysis
Change Orders
Report Menu
Work Orders
Time and materials management as with all
of job costing.
Excel Job Costing Interface
Database View And Search Menu
When creating a new job in JOBCOST
ANALYSIS or ESTIMATING job number needs to be 3 digits and
relates to the specific job that you are creating.
The number will be generated automatically when
adding jobs.
In the rest of the program the job number is the last 3
digits of the account number. EX.
In order for 002 in Job costing to pull in
information from the rest of the program the Account
numbers in the rest of the program need to be numbers like
EX. 23000.002
The JOBCOSTING part of this program
is divided in to 10 main parts(BID SHEETS, ESTIMATING,
JOBCOST ANALYSIS, EDIT GENERAL DATA, UPDATE JOBCOST
ANALYSIS, CHANGE ORDERS, REPORTS, WORK ORDERS, EXCEL
INTERFACE and DATABASE VIEW MENU )
The first part of Job Costing is
Data Manager.
As with the other modules this option is for general /
basic information on the different jobs.
The second part of Job Costing is
BID SHEETS.
This option allows for the automatic production of bid
sheets by posting ESTIMATE information in to BID SHEETS
after changing the different amount percentages to account
for profit to the job being bid for.
The third part of JOBCOST is
Estimating / Budgeting.
The words estimating and budgeting are synonymous.
ESTIMATING/BUDGETING is not linked to anything because it
is usually used before any activity has begun on jobs.
In the fourth part of job costing
is job cost analysis and this part of the program is
available on request only.
This is the most comprehensive part of Aplus
Accounting
and calculates what is received and
paid on the different jobs.
.14.
The fifth part of JOBCOSTING is
CHANGE ORDERS.
Cost over runs frequently occur on jobs and require an
additional contract between the contractor and contracted
for the purpose of acknowledging the additional cost over
runs on the job.
This options does not interface with anything else,
but when the contracted is invoice and pays on the
additional work then the effect of the change order will
be seen.
The additional assumption is that
the because change orders are a cost overrun, the
universal construction code is already entered in BID
SHEETS, ESTIMATING and JOB COST ANALYSIS.
The CHANGE ORDERS is one of the
many parts of the program that automatically generate a
number, in this case the CHANGE ORDER NUMBER.
The sixth part of
JOBCOSTING is JOBCOST REPORTS.
The job cost reports link to accounts receivable,
accounts payable and payroll.
By being able to access all of this information in
single reports the program determines all profit and loss
information applicable to the different jobs as the job is
in progress.
The seventh part of JOBCOSTING is
WORK ORDERS.
Work orders are for assigning work to employees in an
extremely structured manner.
Job Costing as usual there are 2
sets of address.
There are 6 date fields in WORK ORDERS determine
different parts of the work progress, as well as the usual
universal construction codes and descriptions to tie in to
each work assignment.
.15.
Work orders has its own help
section off of the ? icon as is repeated in the next
paragraph:
Work orders is a part of Job
Costing that keeps detailed information on work in
progress. By
comparison Bid sheets do a good job of bidding for jobs,
Estimating does a good job of figuring expenses on jobs,
Job Cost analysis and Job Cost Reports do a good job of
keeping track of what is currently being spent and made on
different jobs.
There is a fairly comprehensive
REPORT MENU off of the main WORK ORDER SCREEN.
Work Orders are divided in to
incomplete work orders and completed work orders.
Only work orders that are marked
as completed will post to the Stored / Completed /
permanent work order database.
Likewise the work order reports are divided in to
incomplete and completed.
In addition Post Completed Work Orders To Invoicing
posts from the stored work order table to invoicing
without deleting any work orders in the work order module.
Future versions of this program will post to
payroll.
The reports work off of Date Due.
If you do not fill in Date Due then the reports
will not show.
The ninth part of Job Costing is
Excel Job costing Interface.
This options is designed to export the Aplus
Accounting database files to EXCEL .XLS files.
In doing so it overwrites all information in
previous .XLS files.
The tenth part of JOBCOSTING is DATABASE VIEW MENU
which allows the user to view the different Aplus
Accounting database files in grid format, much in the
same way you would if you used the EXCEL JOBCOSTING
INTERFACE.
.16.
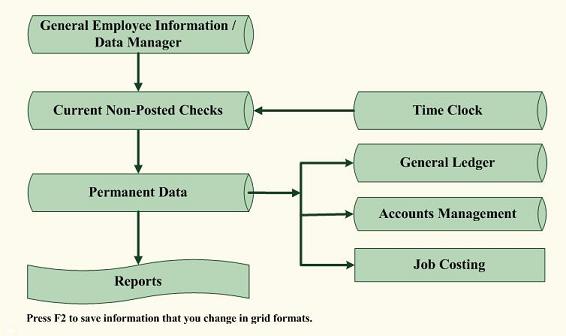
Payroll
Basic Payroll
Comprehensive Payroll
Check Register
Accounts Management
Check printing and batch processing.
Time Clock
Post time clock information to payroll
checks.
Report Menus
W2s
Usernames are up to 25 characters
and passwords are 20 characters.
As with most of this program the
payroll module is extremely comprehensive as can be scene
with the equations for GROSS and NET.
GROSS = (RATE *HOURS) +
((RATE*1.5)*OVERTMHRS) + BONUS +VACATION
+OTHEARN-GARNISH-HEALTHINS-LIFEINS-PENSION-ADVANCES-DENTAL-WORKMENSCM-UNIONDUES-LOAN-OTHDEDUCT
NET = (GROSS - TAXES + BENEFITAMT)
TOTDEDUCTIONS=
(ADVANCES+DENTAL+GARNISH+HEALTHINS+LIFEINS+LOAN+
OTHDEDUCT+PENSION+UNIONDUES+WORKMENSCM)
As with the most of the program you
must first enter general information (employee name,
employee number, deductions and state withholding percent)
before you can write them checks.
If something does not look like it
calculated correctly chances are that it did calculate
correctly and you are not seeing all of the fields in use
on the screen you are on.
The payroll program is divided in
to seven main parts.
The first part of the payroll
program is BASIC PAYROLL.
This works much in the same way as BASIC CHECKING
in ACCOUNTS PAYABLE but has all of the many payroll fields
that you should have available to you in any payroll
program.
The second part of the payroll
program is COMPREHENSIVE PAYROLL.
This works much in the same way as BASIC PAYROLL.
All of the fields that you should have available to you in
any payroll program are here as in BASIC PAYROLL expect
all most everything is in a grid format instead of in a
screen format.
If you want something to save then get off of the last
field / column you enter something in before exiting and
if anything is not saving correctly then press F2 instead
of escape to exit. You can mark a record for deletion by
clicking on the extremely narrow far left column without a
label above it.
This will turn the small square black and then when
you exit it will be deleted.
.17.
The third part of the payroll
program is PAYROLL - JOBCOSTING.
While Basic payroll and
comprehensive payroll works off of the same data as
PAYROLL - JOBCOSTING they only lets you write one check to
an employee per check run, with PAYROLL - JOBCOSTING you
can only write multiple checks to an employee per check
run.
This menu option allows the user to
search for the employee by employee name.
Once this general information has been located the
computer prompts the user for either check information or
to return to pay roll menu.
If the user chooses the check information option
the program prompts the user for more detailed information
such as check number, amount, job name.
The payroll program then stores
this information for later user after calculating all
taxes and letting the user view the taxes.
The fourth part of payroll is the
payroll check register which is described in the check
register part of this manual on page five.
The fifth part of payroll is the
time clock which can keep track of all employee work time
through them clocking in and out.
As in all the main modules of this program you need
to have the general information such as the employee name
set up at least in part before they will show up on the
time clock.
Time Clock is security intensive
and therefore, does require a that Administrator USERNAME
and PASSWORD be entered in to TOOLS - PASSWORDS if you are
using any other options except CLOCK IN
and CLOCK OUT.
Entering any other option except
CLOCK IN and CLOCK OUT will be evident in the Exception
Report (changed data report). The USERNAME and PASSWORD
information for CLOCK IN and CLOCK OUT comes from the
general payroll information which may be seen in the
PAYROLL - Data Manager.
The USERNAME and PASSWORD information for options
other than CLOCK IN and Clock Out comes from Tools -
Passwords.
The sixth part of the payroll menu
is the report menus. The reports show information in
different forms and with different combinations of
information.
If you don't see the information in the form you wish then
try looking at a different reports (if all the different
variables on each check where put side by side on the same
report the report would be too wide for any printer).
As with the rest of the program many of the payroll
checks are date coded so that you may have reports for any
time period you wish.
The paywords will fill in for you
to 1 cent under $23,000.00.
Past that amount you will have to fill in the
paywords your self - for now.
NOTE : General payroll information such as name, state
w/holding percent, deductions and marital status must
be entered in the general information Grid or the last
part of the payroll module DATA MANAGER before the
federal and state taxes will calculate correctly.
.18.
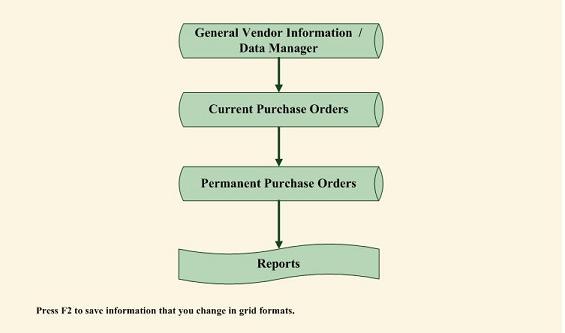
Purchase Orders
Enter Purchase Order Information
Dispute Interface, Shipping Interface
Data Manger
Report Menus
Purchase Orders look similar the
invoicing part of the program and act in exactly the
opposite way from invoicing.
That is, instead of billing a customer will an
invoice for a product you sold them or that you are going
to sell them, you are sending your vendors a form stating
what it is that you are going to buy from them.
Keep in mind, you have not bought anything from
anyone yet, therefore, there are not any amount paid
fields or any credit card interfaces in purchase orders.
Use the main Accounts Payable module to pay companies for
products at the time you owe them the money.
The main fields ( not the more
detailed fields like SHIPPING, TERMS, SHIPVIA ) in
Purchase Ordered are QUANTITY ORDERED, QUANTITY RECEIVED,
PRODUCT, UNIT PRICE and TOTAL.
If you leave the TOTAL field blank and fill in
QUANTITY ORDERED and UNIT PRICE then the program will
automatically fill in TOTAL with ( QUANTITY ORDERED * UNIT
PRICE).
This purchase order program is
divided in to three main parts, PURCHASE ORDERS (which
processes PO's), LOCATE (which retrieves PO's ADDS / EDITS
/ REPRINTS Purchase Orders) and the Purchase order REPORT
MENU.
The PURCHASES ORDER section prompts
the user for variables such as product, quantity, amount
invoiced, amount paid.
It then calculates the amount due and stores this
information for recall in reports or in actual purchase
orders.
The REPORT MENU on this program
accesses all PO information ever entered by accessing
various purchase order reports using information in both
the current and permanent databases.
The remaining options ADD, EDIT,
DELETE vendors have to do with file maintenance and are
designed for more general vendor information management if
needed and act off of the same vendor databases as the
(Add vendor, Delete vendor, Edit and Grid) in the ACCOUNTS
PAYABLE MENU.
As is the similar case with the rest of the program,
vendors need to be ADDED before PO's may be written to
them.
POST RECIEVED Pos TO PERMANENT DATA
will not post anything unless you mark purchase orders as
received with some mark in the received field.
.19.
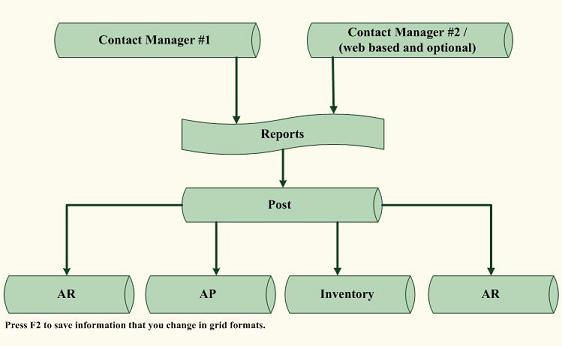
Contact Manager
Contact management allows for the
storage off all names, addresses, phone numbers, email
addresses, website information and miscellaneous
information on anyone who's
information you wish to store and retrieve.
Reports Menus
The report menu section has a
option to post any contact information to Accounts
Receivable, Accounts Payable, Inventory or
Payroll so that if someone becomes
a customer, vendor or employee, you will not have to
re-enter any of their general information.
The most basic type of program in
the world in my opinion is the contact manager.
This type of program / in this case module keeps
tract of general information.
If you are speaking with someone and they are not a
customer and they are not a vendor or employee and you
wish to keep their contact information this is a good
place to put them.
The data for this module was
originally set up for a travel agency and lists a couple
hundred resort hotels around the United States with some
of the pictures running off of the View button (that is on
all general information screens).
If you do not have this resort information and
would like to have it let us know.
When you press ADD in contact
manager the date field automatically enters today’s date
so that the reports off of the REPORT MENU BUTTON can
filter off of different date ranges.
.20.
Tools
Enter current company information and check
formats.
Backup data, restore data and delete data
before a date.
Import data into the accounting program.
Enter zip codes and tax rates.
Login and exception reports.
Area Codes, States and Country lookups and
searches.
The TOOLS program lets the user
manage file information in a variety of different ways and
view computer configuration important to the program's
operation.
The first two options of this menu
enable the user to back up programs data to either drive
E: or drive F:. The second two options of this menu enable
the user to restore programs data from either drive E: or
drive F:.
Delete all data before a date. /
Year End Closing deletes all data in permanent databases
with data earlier than the date you specify.
Beware, do not
delete any data you wish to keep of you will have to
restore it from back up data.
The PASSWORD option of the TOOLS
menu is larger than it looks.
If you do not leave a password in this space then
the program will not prompt anyone for passwords.
If you do leave a password in this space the
password programming will be activated.
You can type in as many usernames and passwords as
you like and require that people using the program
remember their usernames and passwords that are entered
here. If the
program is used in this manner then various parts of the
program like the restaurant module will keep track of who
has been using the program when and will run some reports
on this subject. Usernames are up to 25 characters and
passwords are 20 characters.
CHECK DATA FILES AND DISK SPACE
shows what data files the program is using and how much
hard drive space is available.
This program needs at least 20 megabyte(20,000,000
bytes) for itself to operate correctly.
Your hard drive should have at least 300 MB of free
hard drive space for a healthy hard drive.
CHECK COMPUTERS MEMORY checks random access
memory(RAM) on the computer while this program is running.
Available RAM should be at least 128MB.
Various diagnosis tools such as defrag and
MSSYSINFO can tell you if you are having hardware problems
with your hard drive or RAM.
ENTER ZIP CODES AND TAX RATES is
originally from the US post office and contains many
domestic and foreign zip codes which the
various ZIP buttons in the program
will act on after you type in a zip code.
Right now the accounts receivable data manager is
set up so that if you enter a zip code and then press
enter or hit the zip code button then the city, state,
country, city tax rate and state tax rate will be filled
in for you. We
do not wish to keep track of all of the city and state tax
rates for the country, therefore, if you are doing
business in a certain city and state you may wish to go in
to the ENTER ZIP CODES AND TAX RATES option and make sure
the tax rate information is correct for the areas you are
doing business in.
ENTER CURRENT COMPANY INFORMATION
is a good place to keep your contact information and tax
license numbers so that this information may be
automatically added into some of the reports, such as,
contact information will appear in invoices and purchase
orders to name a couple.
PACK ALL DATABASES, compresses all
of the databases used in the program which makes the data
more efficiently stored and free of any accidentally added
blank records.
The next version of TOOLS will
contain a CONTRACT button of many of the world popular
contracts not included in the rest of the program such as
Copyright, Patent, Incorporation contracts to name a few
of many.
Company Logo options will also be
listed here.
QUIT
Many of the menus have the word
quit written on them.
This does indeed get you out of the program.
.22.
NOTE
ON THE GRID / BROWSE EDITOR
The parts of the program options
which have the word Grid or the word edit in the option
use the Aplus Accounting grid editing feature.
You can move anywhere in the data and any changes
you make may be saves by pressing F2. If you wish to
delete a data record(row) press CTRL/U or click the far
left extremely small unmarked field and make sure you see
it turn black. move off of the row you have marked for
deletion and then press F2 to save changes and deletions.
We believe in letting users enter
information in grid formats should they wish to.
Spread sheets have been extremely popular in the
past probably in part because of this full screen data
editing capability.
Escape on a grid option should not
save anything if you stay on the same record you edited.
If you move off of the record you edited then
Escape or F2 on a Grid option should save your changes.
If you are entering information in
a grid you need to get off of the current field / column
before the information in the field will save.
Hopefully this will be better in the new version of
Aplus Accounting that just came out. ** This is one of the
few cumbersome parts of this language compiler we have
seen. If this
is bothering you, one could use other parts of the program
and not use grid formats to enter and edit information.
Records may be added to grids by
the drop down menu then go to Tools The go to Append New
Record. If you
are adding a record to Invoicing or Purchase orders for a
new Invoice or Purchase order line item then you should
include the new invoice number or purchase number in the
new record.
.23.
Common user mistakes.
General information such as name,
address tax percents need to be added on customers,
vendors and employees before check information can be
added.
There are different databases in
each program module for organizational purposes.
For example,
names, addresses, phone numbers in general
databases,
check information in detailed databases and past
information is posted / stored in the permanent databases
( so that current information is not cluttered up by what
you have done in the distant past).
If you are not viewing information
you have entered it may be because it is in a different
database than you are looking for it.
For example, in accounts payable and payroll
you must store detailed check information with X's
or *'s to the check registers before you can print checks.
There is a minimum amount of
information you can enter in to the program, such as,
names and amounts and the program will function.
The drawback to only entering the most important
information and not entering other information, such as,
account numbers, category numbers and dates is that you
may not see all of the information you may like on the
reports if it has not been entered in the input parts of
the program.
Some of the reports are in Elite or
Condensed print.
If you are using the wrong printer driver for your
computer the printer might not switch to elite or
condensed print.
Another solution to this problem is to turn your
printer on condensed or elite print if your printer
supports this.
The reports aged payable, tax
reports, year to date reports) where made elite and
condensed because of the large volume of information
variables they contain.
If you have any trouble with setting up your
printer feel free to call our technical support line.
If you are using job costing the
job number is the last three digits of account number/job
number.
Example 21000.155 . This number could represent an
accounts payable on job number 155.
.24.
Because of the 155 tagged on the
end of the account number this associated information will
be pulled in to job costing providing a job number
00000.155 is created in job costing analysis or
estimating.
When creating a job in EDIT in
JOBCOSTING the program will automatically assign the job
the next available job number, such as 155 so that the
computer can process the number correctly even though only
the last 3 digits of the account number is the job number.
In both accounts receivable and
accounts payable the invoice number is the most important
number because it ties together all payments and partial
payments.
Suppose you are in accounts receivable and you have
invoiced a customer on one invoice for several items they
have bought and they paid you partially upon ordering.
Then at later dates, they send you different checks
for the remainder due on the invoice.
When you Enter Payments in accounts receivable -
Enter Payment information, and have entered the proper
invoice number you are getting paid on, the program will
search through everything that has been paid and invoiced
on that invoice number both in
invoicing and in Enter Payment information and if the
amount received is greater or equal the amount invoiced
all of the invoice items will be marked as paid and this
invoice will no longer show up on unpaid reports.
Similarly, in accounts payable if
you pay several times on an invoice you have received, and
the correct invoice number is entered on the different
checks you are writing, the invoice will be marked as paid
when the amount paid is greater or equal to the amount you
have been invoiced and this invoice will no longer show up
as unpaid on reports.
.25.
Add-Ons
One of the great things about this
program is it may be run on most of the world’s major
operating systems or computer systems. (DOS,UNIX, OS2,
VMS, WINDOWS or MACINTOSH)
In addition, this program has worked with all
network configurations we have yet tried it on.
This program now has bar code
scanning capabilities for an additional $925.00 which
includes scanning hardware, scanning hardware set up and
training.(Great for inventory).
FUTURE ENHANCEMENTS
Additional Specialized Accounts receivable sub modules
such as INTERNAL MEDICINE, LOANS, RESTAURANT, SALES ORDERS
and Fax interface.
Fax
Interface
For further
information contact us at
www.LawSoftware.biz
or
info@LawSoftware.biz

|